Sunday, March 28, 2010

April Guest Designer at SBKC!


I am so excited to tell you that I am the guest designer at Scrapbook Kit Club for April, and would you just look at the amazing kit that I got to work with!! First off, I want to thank Amber for having me as the guest designer this month! I'm thrilled and honored! The kit is filled with amazing products by Cosmo Cricket, American Crafts, and Maya Road! The kits at SBKC are really fantastic, and Amber's customer service can't be beat! You get A LOT for your money! If you're looking for a wonderful kit, I cannot recommend this one enough! Go take a look! Tell Amber that Carol sent you! ♥


Here's the first layout that I created! I just love it! This is a photo of Emily on Christmas Day 1997. Isn't she adorable? Dave and I asked her, "How big is Emily?" The answer to this question is, of course, "SO BIG!" This is one of my favorite photographs EVER, so it deserved to be showcased on a layout all by itself! I used the rulers from the Cosmo Cricket Material Girl patterned paper. They're perfect! I also detail cut the small border under the photo, and detail cut a flower also from Material Girl papers. The chipboard title is also by Cosmo Cricket. I usually dislike the look when crafters leave the centers in the letters (as seen on the "o" and the "b" in my title), but with these letters, I think it looks awesome! I cut the pennant banner from a Dear Lizzy paper by American Crafts. The pom pom trim, crocheted flowers, and kraft envelope are all by Maya Road. I finished off this page by adding a zig zag machine stitch all the way around. I love it!


For my second layout I created with the kit, I wanted to feature some favorite photographs of Jessica! She used to make the cutest scrunchy face when she was a baby! Totally adorable! I cut the banner across the top and all of the semicircles on the left side from Dear Lizzy papers. The brown strip and the pink strip at the bottom of the layout are cut from fabric paper! Very cool, and it has such a great texture! The title is Cosmo Cricket chipboard, and the flower was detail cut from Material Girl. I took apart one of the Maya Road kraft envelopes. I journaled on the flap, and then I matted my photos with the rest of it! Once again, I added some machine stitching around the layout. I love the way it finishes off the page! I love this layout too! ♥


This layout features a photograph of the girls and I in Palm Springs, California. We flew out to visit my mother-in-law right after Emily turned 2. Vicky took the girls and I to a beautiful wildflower field, and we snapped this pic. I love it! I detail cut the bottom and the pennant from Dear Lizzy papers. The flowering branch on the upper left is from the fabric paper. I added a glitter Thickers title, and a ribbon flower. Once again, I sewed around the background. In case you didn't notice, I'm totally into sewing lately! This page is simple, but I love it! I really let the photograph be the main focus of the layout!


I love that Material Girl is all about sewing, so I just HAD TO create a layout about one of my favorite things . . . my sewing machine! I love this machine, and what I love even more is that it was only $15 at a garage sale. It is the best garage sale find EVER!! I sewed some denim to a border element, and I made some denim flowers in my Cuttlebug! I detail cut three spools, and then I added thread to them! I love the way that looks! I added some buttons, and I sewed them to my layout. I also added a button with twine. I did a ton of zig zag stitching on this page (of course!), and I added a title with Thickers! Once again, I love it! I should hang this above my sewing machine!


I had so many scraps on my desk, that I had to create a card! I used the extra folio closure from the envelope that I used on the "Scrunchy Face" layout as my flower center! Isn't that cute? I also mounted the chipboard sentiment on some of that envelope. Believe me, I used that envelope up! I love the Maya Road ribbon. I knotted it, and pushed through two of the amazing straight pins! Beautiful!


For my last project, I created a "We Are Family" banner from the Maya Road chipboard people that came in the kit! This represents us! Dave is decked out in Harley Davidson denim, I am in red (which is my favorite color), and Emily is in blue gingham, and Jessica is in green gingham. The ginghams are the backsides of Material Girl! The alphas are by Jenni Bowlin. I gave myself a diamond necklace, and the girls both have skirts! All three girls have flowers in their hair, and Dave's chipboard piece has a motorcycle brad! The "LOVE" is Cosmo Cricket chipboard. Not everything that I used came in the kit, but I did my best! I haven't decided where I'm hanging this yet, but I love it!

So, I hope you enjoyed looking at the projects that I created using the AMAZING April kit at Scrapbook Kit Club! I cannot recommend this kit enough! Amber's kits are wonderful! Try one, you won't be disappointed! Thanks for stopping by!
Friday, March 26, 2010

Liberty Square


I love creating my Disney layouts!! I created this layout for a recipe challenge that I issued at Scrap-Friendzy. The recipe consists of elements that must be used on your layout. I decided on three required items: (1) a border punch, (2) felt, and (3) buttons. That's it! I used my threading water punch, some cute felt ki Memories flowers, and some awesome Bo Bunny buttons. This layout also uses a cute Jillibean Soup journaling spot, Jillibean Soup twill, Pink Paislee letter stickers, a flourish that I cut from a K&Company patterned piece of paper, patterned paper by Scenic Route, and a background ledger sheet by Creative Imaginations. I really like the way this layout turned out!


Another challenge at Scrap-Friendzy right now is to create your own kit and then use it! I created a kit, had a lot of fun putting it together, and I used it on the layout above! I will be creating more projects using this kit!

I hope you have a great day! Thanks for stopping by!

Winner!

Thank you for all of the birthday wishes yesterday! I had a wonderful day!

Here's the winner of the blog candy!

Random Integer Generator

Here are your random numbers: 4

Timestamp: 2010-03-26 11:42:45 UTC

The 4th comment on yesterday's post is:

Scrapronicity said...You are sweet Carol...but of course I already knew that. :) Happy birthday my bloggy friend!! I hope you can do something cool and fun today...have a FANTASTIC day!! :)

Yeah Jodi!! I will get it mailed out to you today, and I hope you enjoy using it all!!

Thank you to all of you who entered!

Thursday, March 25, 2010

Birthday Blog Candy!


Hi Everyone! It's my birthday, and I haven't done blog candy in a LONG time, so I'm going to give one of my Internet friends a present! Why? It's because you're all wonderful, you make me happy, and it's the least I can do!! So, leave a comment, and I will pick a winner tomorrow and send this off! So, what are you going to get? How about 5 sets of Pink Paislee alphabet stickers, 5 sets of Basic Grey rub ons, and 3 sets of American Crafts Remarks stickers! You can click on the photo to enlarge the photo! I will ship anywhere! One last comment . . . if I don't know you because you don't visit my blog regularly, and I don't know you from a message board, welcome to my blog, but please don't comment on this blog candy post. I will be sending this blog candy to one of my Internet friends that I already know, because that's the purpose of this blog candy!!!

I hope you have a great day, and thanks for stopping by!!

Tuesday, March 16, 2010

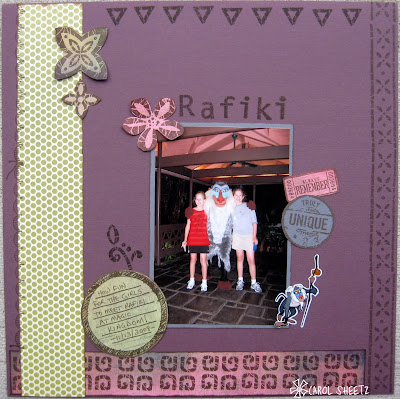
Rafiki


I created this layout to challenge the members at Scrap-Friendzy to "get out those stamps and use them on a layout"! This page features cardstock, various papers, one photo, and one sticker. Everything else is stamping! It was actually fun to create a page with a lot of stamping. I mostly used a Stampin' Up set, and I also used some Autumn Leaves acrylic stamp sets. I love this photo of the girls meeting Rafiki at Magic Kingdom! I love the way this page turned out!

I hope you're having a great week so far. Thanks for stopping by!

Thursday, March 11, 2010

Triple Mountain Whammy!


I created a two-page layout featuring six photos from our Disney trip, and I love the way it turned out! While we were in Disney, we saw a program about the 10 things that you HAD TO do while in Disney. One of them was the "Triple Mountain Whammy!" It consisted of riding Space Mountain, Big Thunder Mountain Railroad, and Splash Mountain. Of course, we road all three, and I think we will all agree that Big Thunder Mountain Railroad was our favorite! I kept these pages simple with clean lines. The orange paper and the paper under the title and the journaling are both My Mind's Eye, and the brown patterned paper is by K&Company. I added some felt flowers by Jillibean Soup. I did the title and the journaling on my computer. I also did some sewing and added two sets of rhinestone trios. Two more pages for the Disney album are done!

I hope you're having a great day. Thanks for stopping by!

Tuesday, March 9, 2010

Yum!


I just love the way this layout turned out!! This photo is the BEST! We really enjoyed the Mickey Mouse ice cream bars that we got at Magic Kingdom! Delicious! The red paper is Cosmo Cricket. The fantastic corrugated letters, the red ric rac, and the red and white gingham ribbon are all by Jillibean Soup. The journaling spot is Jenni Bowlin. The very cool Mickey Mouse coaster came from a garage sale. I have a few of them, and I love them! I added some Primas, buttons, twine, and three rhinestones. Another Disney layout . . . DONE!!

I hope you're having a great day. Thanks for stopping by!

Downtown Disney


I'm going to be getting back to my Disney layouts! This one features Jessica "shopping" at the huge Disney store in Downtown Disney. Both of the girls loved trying on all of the hats. Jessica really liked the cute stuffed yeti too! The blue patterned paper is by My Mind's Eye, and I cut the shape on my Cricut Expression. The top photo has a strip of Cosmo Cricket paper next to it. I stamped the "checklist" Unity stamp on a small brown paper bag that I had on my desk. I added some cork letters for the title, and drew a black marker border around the page. Finally, I added some Primas and rhinestones. I'm not too sure I'm digging the shape that I cut the blue paper in, but I don't do pages over, so it will have to be fine!!

I hope you are having a great day! Thanks for stopping by!

Friday, March 5, 2010

Sisters


Recently, Amy who owns My Monster Creations contacted me and told me to pick an album off her site to work with. I visited her site and picked out a very cool bracket book that consists of four pages and an acrylic cover. She sent me the book, and I was really wowed by this album! The pages are MDF, and they are sturdy! I couldn't wait to get to work!


Here are the pages and the acrylic cover. The acrylic cover comes completely protected, so it is scratch free. My cover has scratches on it, but I'm the one that put them there!!


I'm just trying to show you how impressively thick the pages are! Really substantial!


I could have painted my pages, but I decided that I wanted to cover them instead. I measured the widest parts, and cut rectangles to cover my pages. I used a combination of kits on my album. One I got at Scrap-Friendzy, and the other I got at Scrapbook Kit Club. Both sites are awesome!


Here's a closeup of my first page covered in AWESOME Pink Paislee paper! I used my Basic Grey files, and I filed down on the paper at the edge of the page. It gave me a very clean edge!


Sanding the paper off is a little messy, and there is a lot of dust, but it's worth it! The edge turns out clean!


Here's the first page all finished up. I had orginally thought that I would paint or ink all of the edges, but I really loved the clean look and edge, so I left it. This bracket page shape is awesome!


I designed the acrylic cover, and here it is over the first page. The dotted paper shows through. Pretty, huh?!?


When I was done, I added some round clips to hold the album together. I was going to go crazy with the ribbon on the rings, but I love the simplicity of the one piece of tulle on the ring. Pretty, simple, and clean. Now, here are pics of the finished album. I really love the way it turned out!


This is the backside of the acrylic cover and the first page.


I used photos of my girls when they were little. Wow, did this take me back! My girls have always been so cute and sweet!


I just love all these photos! Where does the time go?


Isn't the photo of them hugging just adorable? The last page jumped ahead to now. Sisters always and forever! I love these two with all of my heart!!


On the backside, I added the Pink Paislee "made with LOVE" element. Perfect finishing touch, do you think?

I have to say that working with this album was really fun! It's wonderful! I encourage you to visit Amy's My Monster Creations site and check out what she has to offer. She told me she's finishing up some new selections, and she'll have them on her site soon!! If you work with one of her books, you will not be disappointed! Sturdy and beautiful! I love what I created, and I will treasure this book! Thank you Amy for asking me to design with one of your books. It was my pleasure!! Thanks for stopping by!

Thursday, March 4, 2010

Some cards!


I haven't made cards for a while now! I created these for a challenge over at Memorable Seasons. We were challenged to use two certain items (ribbon, circles, sparkle, etc.) on our cards, and the sentiment had to be food related.


For this first one, I used the wonderful Mr. Campy by Cosmo Cricket. I love this little marshmallow guy!! I hand cut the heart, and I created the "I love you s'more!!" sentiment on the computer. I love Mr. Campy!!


This second one features a fun Unity stamp set that I purchased. I did a little bit of coloring, added beautiful lime green lace, and a very cool felt flower. I love this!


This card features a $1 acrylic stamp that Dave and the girls got for me. The grill is so cute! I colored it, cut it out with my Coluzzle, and then threaded it on the gingham ribbon. I created the sentiment on the computer. I love the picnic feel to this card!


I used my Coluzzle to create a circle card. I added a Pink Paislee journaling piece to the front, and I added some Stickles to the cherry to give it some sparkle. I also added a Prima. I think it's cute!

I hope you are having a great day! Thanks for stopping by!!