Showing posts with label altered items. Show all posts

Sunday, December 11, 2011

25 Days Until Christmas 2011


Wow, it's been a long time since I updated my blog or did anything crafty. I miss my creative time. Working full time leaves little time to do things that I want to do. My free time is spent doing things that I have to do. Oh well! Maybe in time it will all get easier. Anyway, here is the cover to my 25 Days Until Christmas book for this year. I love the way it turned out. Obviously, I'm already far behind on this book, but I'll be able to print some pics this week, and quickly put pages together. I keep this book very simple, so I should be able to get many pages done in one night. We'll see! Considering I haven't even decorated yet, it's pretty obvious that I'm behind on pretty much everything!

I hope you're having a great day. As always, thanks for stopping by!

Tuesday, April 19, 2011

Carol's Smash Book!


I made a Smash Book to take on vacation!! I love the way it turned out! It's 6x12, and I used my Bind It All to bind it! I used paper that I don't particularly care for anymore, and it's perfect for this book! The papers are going to be covered up anyway! I can't wait to start adding things to my cool new Smash Book!!


The papers are pretty BOLD, aren't they!?! What was I thinking when I bought some of them!?! I hope you're having a great day! Thanks for stopping by!

Wednesday, February 9, 2011

Friendz with He{ART} Scrap-Friendzy Blog Hop


Welcome to your 1st stop on the “Friends with He{ART}” Scrap-Friendzy Blog Hop! If you are following the links from the beginning of the hop, you should have come from the Scrap-Friendzy blog. If not, and you wish to participate in the blog hop, please start at the Scrap-Friendzy blog.

I am happy to share my version of a treat container with you today! It's called a 2-5-7-10 box. I created these Valentine-themed containers just for the blog hop!


What's a 2-5-7-10 box? Great question! It's a little container that you can create with just one sheet of cardstock, some scored lines, and some adhesive. Easy as can be! I found how to make the 2-5-7-10 box on Splitcoast Stampers. You'll definitely want to check out the tutorial on that site! For my containers, I do not stamp on the cardstock (step 3 in the tutorial), I used my threading water punch on my box flap (step 5 in the tutorial), and I added a 2 3/4" x 4 3/4" sheet of patterned paper to the front of my container! My containers are holding three fun size candy bars. These are the perfect size for small Valentine treats!

Your next stop on the blog hop will be Jean's blog. Don't forget to leave a comment here, and on each stop on the blog hop. Then, make sure you finish up at the Scrap-Friendzy forum and post that you have completed the hop. Your name will be entered into a drawing for a fabulous prize! We're also hosting a weekend crop from Friday, February 11 through Sunday, February 13 on the forum. We hope you will join in the fun!


I'm also offering a small RAK during this blog hop! All you need to do to be eligible for this Bo Bunny Cambridge card kit is leave a comment on my blog! I will randomly select a winner! We would love it if you would also post about this Friendz with He{ART} Scrap-Friendzy blog hop on your blog, Facebook, or any other place that allows it!

Start at the Scrap-Friendzy blog!

Then follow the blogs in this order:

Carol <------- YOU ARE HERE!! :)
Jean <------- Visit this blog next!

I hope you enjoy all of the stops on the blog hop! Thanks for stopping by!

Monday, November 29, 2010

December Daily - 25 Days Until Christmas - 2010


Instead of taking photographs of the inside of my book, I decided to create a video! Let me know what you think! As always, thanks for stopping by!

Friday, August 6, 2010

Welcome Home Banner & Clip It Up Posts!!

First off . . . my first Clip It Up post is up on the blog!! There is also a post introducing me! I would love it if you would comment on both posts! I want Renee and the girls to know that I have amazing scrappy friends! I love, love, love my Clip It Up Jumbo! It's totally COOL!

Next, I am missing Emily so much!! I wanted to make her a welcome home banner. What started off as a small banner ended up as a HUGE banner! It took on a life of its own! I love it though, and I hope Emily does too! I can't wait for her to see it!


I hope she likes it!! I hope you have a GREAT weekend! Thanks for stopping by!

Tuesday, August 3, 2010

More Bo Bunny!


Here are a few more Bo Bunny projects! I altered a plaque for a very good blogging friend of mine! This is for her adorable daughter Evie! I used Bo Bunny Jazmyne! I love the way this turned out! I did a lot of detail cutting for the flower cluster, and then I added two strips of paper that I used my threading water punch on. I had to cut the backside of the strips to get them to curve around the plaque, and the effect is just so CUTE to me! I love the scallop edge! Finally, I added two Tim Holtz tickets! Dream and Giggle . . . perfect for a beautiful baby!


This is the "before" shot of the plaque! I pick these up at Michael's and alter them.


Here's a quick card that I made. I used the Jazmyne letters that I painted. I really love the way they turned out! This card uses both Jazmyne and Mama-Razzi! I used my Tim Holtz Tattered Floral die to make the flower. Love it!


Here's another card that uses Jazmyne! I love the subtle glitter on the Bo Bunny papers! Just beautiful!


Last, I made a bookmark from a Mama-Razzi paper. I love the sentiment "Life is Beautiful". How true! I added a gorgeous Mama-Razzi flower stack too! I love bookmarks!

I hope you're having a great day. Thanks for stopping by!

Saturday, June 12, 2010

Altered Notebook & A Layout!

I created both of these projects for the awesome challenges that are going on over at Scrap-Friendzy's Camp-Friendzy! Come over and check it out! It's a lot of fun!!


I altered a notebook for a pre-camp challenge. I used what I considered to be an obvious choice for a camp-themed challenge . . . Cosmo Cricket's Mr. Campy! I love the way this turned out! The blackboard shapes are so cool!


I created this layout for another challenge where we needed to use banners or flags on our layout. I used both! I cut the awesome banner from a sheet of paper from The Girls' Paperie, and I added two little travel-themed flag pins from Making Memories. I really like the way this layout turned out!

I hope you're enjoying your weekend. Thanks for stopping by!

Friday, March 5, 2010

Sisters


Recently, Amy who owns My Monster Creations contacted me and told me to pick an album off her site to work with. I visited her site and picked out a very cool bracket book that consists of four pages and an acrylic cover. She sent me the book, and I was really wowed by this album! The pages are MDF, and they are sturdy! I couldn't wait to get to work!


Here are the pages and the acrylic cover. The acrylic cover comes completely protected, so it is scratch free. My cover has scratches on it, but I'm the one that put them there!!


I'm just trying to show you how impressively thick the pages are! Really substantial!


I could have painted my pages, but I decided that I wanted to cover them instead. I measured the widest parts, and cut rectangles to cover my pages. I used a combination of kits on my album. One I got at Scrap-Friendzy, and the other I got at Scrapbook Kit Club. Both sites are awesome!


Here's a closeup of my first page covered in AWESOME Pink Paislee paper! I used my Basic Grey files, and I filed down on the paper at the edge of the page. It gave me a very clean edge!


Sanding the paper off is a little messy, and there is a lot of dust, but it's worth it! The edge turns out clean!


Here's the first page all finished up. I had orginally thought that I would paint or ink all of the edges, but I really loved the clean look and edge, so I left it. This bracket page shape is awesome!


I designed the acrylic cover, and here it is over the first page. The dotted paper shows through. Pretty, huh?!?


When I was done, I added some round clips to hold the album together. I was going to go crazy with the ribbon on the rings, but I love the simplicity of the one piece of tulle on the ring. Pretty, simple, and clean. Now, here are pics of the finished album. I really love the way it turned out!


This is the backside of the acrylic cover and the first page.


I used photos of my girls when they were little. Wow, did this take me back! My girls have always been so cute and sweet!


I just love all these photos! Where does the time go?


Isn't the photo of them hugging just adorable? The last page jumped ahead to now. Sisters always and forever! I love these two with all of my heart!!


On the backside, I added the Pink Paislee "made with LOVE" element. Perfect finishing touch, do you think?

I have to say that working with this album was really fun! It's wonderful! I encourage you to visit Amy's My Monster Creations site and check out what she has to offer. She told me she's finishing up some new selections, and she'll have them on her site soon!! If you work with one of her books, you will not be disappointed! Sturdy and beautiful! I love what I created, and I will treasure this book! Thank you Amy for asking me to design with one of your books. It was my pleasure!! Thanks for stopping by!

Wednesday, February 24, 2010

Emily at 13!


Here's a side view of a special project that I just finished.


I made a mini Bind It All album for my daughter Emily. To celebrate her 14th birthday, I decided to make her a book that focused on her first year as a teenager. I used a fantastic American Crafts Teen Collection that I purchased at Scrapbook Steals! I love Scrapbook Steals!! ♥ This book has 41 pages inside! I cut most of the pages with my Cricut Expression. I love the different shapes and sizes! Most of them were cut with the Accent Essential cartridge. I also used Mini Mongrams. I love the way this turned out, and I think Emily loved it too!!


Here's a look at the first page. It's Emily's 13th birthday cake. You can see the cool shapes of the pages! Plus, I love how when you're looking at a smaller page, you can see lots of other pages in the book. I love the colors in this American Crafts Teen Collection.
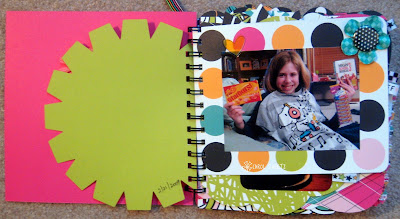

I put photos only on the front sides of the pages, and I pretty much just put short captions and dates on the backs of the pages. This way, if Emily wants to write something about the photo on the page, she can!


I used lots of flowers, flair pieces, and ribbons in this too. The American Crafts Teen Collection ribbon is so cute too!


Love the flair on this one. It says "rock on", and it's on a page with Emily listening to her iPod. Love the iPod sticker!! In fact, I love the funky harlequin print on this page too.


This is a photo of Emily receiving her first iTunes gift card. The bag was weighed down with rocks from my MIL's Arizona landscaping. Very funny!!


This page had to be special, because it's Emily's favorite photograph from 2009!! Jessica asked me to take a picture of her jumping off the saucer swing. I did, and silly Emily jumped into the photograph! The expression on her face is hilarious! I also love that Princess is standing there no doubt wondering why someone isn't throwing her ball! These girls are the best!!


Here are the girls and I with our ginormous slushies from Speedway! We emailed this photo to Dave. He was out of town, and he is the one that normally take the girls to get slushies. He couldn't believe we would go get slushies without him. It was Jessica's idea! It really was!! ☺


In 2009, Emily got her first pair of glasses. Isn't she cute? I love the smaller pages in the book, because you can see so many of the awesome paper patterns behind it!


Love this photo! Jessica was also in the photo, but I cropped her out and enlarged the photo. I wish you could have seen the look on Jessica's face when I told her that I cropped her out! It wasn't good! She forgave me! I made a copy of the photo before I cropped her out. Just so you know that I'm not that mean!!


Dave and Emily were pointing out that the Diet Cherry 7-Up that they're drinking has "antioxidants"!! Ever since we saw the Alton Brown Welch's commercials were he talks about antioxidants and antioxidant power, we just love saying "antioxidants"!! We're crazy!


This is the last page in the book. It's a photo I took of Emily the night before her birthday! It's her last day as a 13-year-old. On the back cover, I wrote her a personal note!! ♥

So, that's just a glimpse of the pages in this 41-page mini album!! I had so much fun making it, and I think giving Emily a look at a year of her life was a great idea! It can't even begin to let her know everything that she did as a 13-year-old, but it can make her smile and laugh at her first year as a teenager!

I hope you're having a great day. Thanks for stopping by!

Monday, November 16, 2009

25 Days Until Christmas 2009


I am very happy to be creating a 25 Days Until Christmas book again this year. I love the way my book turned out last year, and I cannot wait to start filling this one up! My book this year is 10x12, and the front and back cover are chipboard covered with patterned paper. The papers on both the front and back cover and by Bo Bunny. The cover has miscellaneous letters and stickers to make up the title, and it also features a foam snowflake and a jingle bell!


The back cover isn't decorated yet. Last year, I let one of the girls jazz it up! This paper is a Bo Bunny plaid that coordinates with the front cover.


The inside cover is on the left, and once again, it's a Bo Bunny coordinating paper. On the right side, you can see a Teresa Collins paper that I cut in half. I will use a smaller paper like this on a day when we don't have anything too exciting going on! Under that half paper, you can see a Fancy Pants print.


On the right side is another Fancy Pants paper. I will use this page when we put up or decorate the Christmas tree.


I will use the snowflake Cosmo Cricket paper on the right on a day when we have snow. Unfortunately, we get a lot of snow in December!
These are my numbers are cut, inked, and ready to go. I cut them all from a Making Memories sheet of paper. Perfect! I do not put my numbers in my book ahead of time, because I like to rearrange the pages in my book.


Here are some border strips by Cosmo Cricket. They're all double-sided, so I'll just use whatever side works for me. They're all inked and ready. Once again, I add these in as needed.


Here are some journaling squares and sentiments. They're all Cosmo Cricket. Once again, they're double-sided, so if one side doesn't work for me, I'm sure the other side will!
I'll add journaling on these tags. They're all by Cosmo Cricket, and they're all double-sided.


On the right, you can see a smaller Teresa Collins page that I will use for my Christmas Day journaling. Behind that small page is the inside back cover. I am so ready to document our December leading up to Christmas 2009!!

I hope you had a great weekend. Thanks for stopping by!!